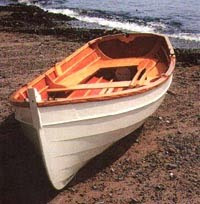
Wednesday, October 7, 2009
Wednesday, September 30, 2009
Good to Go
Tuesday, September 29, 2009
The Boat Cover
The Cover Shop, located in Meridian, Idaho http://www.coversyou.com/, crafted a fine custom cover for this Penobscot made out of Top Gun material. As specified by our customer, the cover has a weighted transom flap and adjustable straps to connect underneath the hull. The three ash bows that Tom fabricated will work in conjunction with the cover to create an arch which will prohibit water from pooling on the cover.
Row, row, row your boat...life is but a dream.
Monday, September 28, 2009
Varnish and Paint
While the various coats cured, Tom laminated knees for the fore and aft center thwarts. Once the boat was flipped back over again, he was able to fit, shape, sand, varnish, and install them. He also installed the stern seat slats after painting the bulkheads, built a bunk for the customer's dock, and ripped three ash bows for use with the boat's cover. After attaching all of the bronze hardware, you can't help but marvel at the beauty of this boat.
Row, row, row your boat...life is but a dream.
Friday, September 18, 2009
Finishing Out the Interior (Part Three)
The building phase is just about complete. This week, Tom added the trim and the sunburst design to the bow seat. We had ordered three sets of brackets (they were chrome as bronze was not available). Each would hold a flexed piece of wood which would then "tent" the cover so that water would not pool on it. But, it just didn't feel right putting those metal brackets on this beautiful wooden boat, so we didn't. Tom fabricated brackets out of mahogany and they blend in much nicer and look far better than the metal ones. He also built the oarlock chocks, rounded the edges of the gunwhales, drilled the stem for the bronze bow eye, applied two coats of penetrating epoxy and the first coat of varnish.
Presently, Tom is building the stern seat. The slats will be cut to match the sunburst design on the bow seat. Also, he is laminating the knees for the fore and aft center thwarts out of Phillipine Mahogany.
The oars arrived from Shaw and Tenney (http://www.shawandtenney.com/) out of Orono, Maine and they are beautiful. They're 8' flat blade spruce with 10" sewn leathers.
Row, row, row your boat...life is but a dream.
Labels:
bow eye,
bow seat,
brackets,
epoxy,
gunwhale,
oarlock chocks,
Phillipine mahogany,
quarter knee,
Shaw and Tenney,
stern seat,
thwarts,
varnish
Friday, September 11, 2009
Finishing Out the Interior (Part Two)
Tom has been working on the interior. So far, he has the breasthook in place which is really going to look nice once the varnish is on. It is a substantial piece of African Mahogany with a beautiful grain. He finished the exposed edge with a nice curve.
The gunwhales are on, hence all of the clamps. They are also done in African Mahogany to match the breasthook. The quarter knees are on at the stern, you can see one of them in the third photograph.
The forward and aft center thwarts (seats) have been dry fitted, but will be removed for routing, sanding, and varnishing. Tom built the thwart knees but was not happy with them, so he is rebuilding them.
Next up:
- Thwart knees
- Bow seat
- Stern seat
- Socket pads for the oar locks
- Socket pads for the cover
Row, row, row your boat...life is but a dream.
Labels:
African mahogany,
breasthook,
gunwhale,
interior,
quarter knee,
thwarts
Thursday, September 3, 2009
Treasures From the Chandlery
For this boat, we have primarily relied on Jamestown Distributors out of Bristol, Rhode Island http://www.jamestowndistributors.com/ and Hamilton Marine out of Searsport, Maine http://www.hamiltonmarine.com/ for our supplies and hardware. Jamestown has very competitive prices and is a one-stop-shop for most of the products we use and Hamilton Marine recently had a very good sale on hardware that we took advantage of. Both companies have proven to be very personable to work with and provide excellent customer service.
Our shipments from Jamestown included one quart of Interlux 4279 Primer White Pre-Kote, two quarts of Interlux 4359 White Brightside paint, four quarts of Epifanes high gloss clear varnish with extra UV filter, one .98 gallon West System 105 Epoxy Resin, one .33 gallon West System 207 Special Clear Hardener, one quart System Three Wood Flour, one quart Phenolic Microballoons Low Density Filler, one quart Chopped Glass, two quarts Interlux 4359 Brightside Polyurethane, one quart Interlux 4233 Brightside Polyurethane, one quart Interlux 2398c Intergrip No Skid Compound, two 2 quart kits of CPES Penetrating Epoxy Sealer, three pairs Whitecap Bow Sockets (two were shipped, third set is en route), one box Silicon Bronze Wood Screws 8 x 1-1/4, one box Silicon Bronze Wood Screws 8 x 1-1/2, one box Silicon Bronze Wood Screws 8 x 1-3/4, 600 8 x 3/4 Stainless Steel Screws, a variety of larger sized silicon bronze screws, one box foam brushes, several foam roller covers, a box of glue brushes, plus a roll of 1/4" blue vinyl tape.
Our shipment from Hamilton Marine included a pair of 2.25" round 1/2" shank bronze oarlocks, two pairs of top mount bronze oarlock sockets, a couple of 5" bronze cleats, and one 3/8" x 4" bronze bow eye.
Row, row, row your boat...life is but a dream.
Labels:
bronze hardware,
Epifanes,
Hamilton Marine,
Interlux,
Jamestown Distributors,
System Three,
West System
Tuesday, September 1, 2009
Finishing Out the Interior (Part One)
A cradle for the boat has been built and it sits on top of the building jig base. This brings the boat up to a nice working height. With the addition of foam, the cradle will also be used in the delivery of the boat.
The first task after turning the boat over was to clean up any epoxy squeeze out that wasn’t cleaned up before it cured. Luckily there were only a few spots that needed attention. The entire interior of the boat then received a thorough sanding before starting the building process again.
A laser level was used to layout the riser lines for the front and rear seats/flotation compartments. I don’t know how they did this accurately before lasers came along. Tech, tech, technology. We're grateful for it. After the lines were drawn, Tom installed the risers as you can see in the photos above.
We feel we are getting close to being done but there are still many items to complete, i.e. seats, oarlock chocks, breast hook, gunwales, epoxy saturation, quarter knees, etc. etc. After the building is complete, the final phase will be the paint and varnish.
Row, row, row your boat...life is but a dream.
Tuesday, August 25, 2009
Ready to Flip
After attaching the last two planks (sheer planks), we went to work fitting the outer stem and keel. Quite a bit of time was spent getting everything just right. An extra keel support piece was added where the keel meets the transom because the boat's keel will rest on a roller when not in use and the front of the boat will rest on a cradle.
Final fairing of the hull was completed before sealing the exposed plank edges with epoxy. Before removing the boat from the building jig, the entire exterior was sanded and then saturated with two coats of penetrating epoxy which was lightly sanded between coats.
Row, row, row your boat...life is but a dream.
Labels:
epoxy,
fairing the curve,
keel,
outer stem
Sunday, August 2, 2009
The Final Plank
All of the planks are on the boat although the sheerstrake has yet to be glued and trimmed to the gunwhale. Next, the outer stem will be fitted and the keel will be attached.
Row, row, row your boat...life is but a dream.
Labels:
gunwhale,
keel,
outer stem,
planking,
planks,
sheerstrake
Thursday, July 30, 2009
In Between the Planks
A bevel in progress.
There are a number of things that need to take place after one plank is completed and the next plank is ready to be epoxied into place.
Bevels:
The first step is to remove the 85+ screws used to clamp the previous plank while its epoxy cures. Once the screws have been removed, the edge of the plank can be trimmed flush with the stringer it is attached to. The router makes quick work of the trimming except around the stem, transom, and bulkheads. In these areas, the trimming is done with a combination of saw, file, and plane. Once the edge is trimmed, a line is drawn 3/4" from the edge of the planking marking where the edge of the next plank will lie. The space must be beveled so that it is on the same plane as the adjacent stringer so that the next plank will have a flat area to lie on. Some beveling will need to be done on the adjacent stringer for the same reasons. Besides beveling the plank edge and the stringer, the bulkheads and transom must also be beveled to accept the new plank. The final step in prepping for the next plank is cutting the gain which was covered in a prior post.
Fitting the plank:
Fitting the plank:
To fit the next plank, the planking stock is clamped to the boat and lines are drawn on it using the stringers for guides. The plank is rough cut a few inches wider than the lines to provide some room for adjustments and to provide for the 3/4" that needs to be added for the 'lap' section that overlaps the adjacent plank (that we just beveled). Once the new plank has been cut out, it can be re-clamped to the boat and new, more accurate lines can be traced onto it. The plank is then removed again so that 3/4" can be added to the arc drawn for the lap edge. A batten is then used to connect the 3/4" marks and redraw the curve. The plank is then sawn about 1/8" outside this line and then a plane is used for final trimming to the line. The final step for this plank edge is to sand it with a sanding block further fairing the curve and putting a slight radius on the outer edge.
After the lap edge is ready, the plank is clamped back on the boat to continue with the fitting process. The lap edge is checked to see that it matches up with the 3/4" line that was drawn for the bevel on the adjacent plank. The fit at the gain is also checked and adjusted as needed. If all fits well, then a line is drawn 3/8" in from the lap edge which will designate the middle of the stringer below it. This will be used when laying out screw locations. If the fit looks good, a couple of screws will be put in to keep the plank from moving throughout the rest of the fitting. The middle of the lower stringer can now be transferred to the plank and marks are made about every four inches on both the top and bottom lines for screw locations. After pre-drilling all of the screw holes, the position of the scarf is marked and the plank is removed to cut the scarf. Epoxy is brushed onto the plank and the boat before applying thickened epoxy to all of the mating surfaces. After the plank has been screwed to the boat, all of the epoxy 'squeeze out' must be cleaned up immediately. Excess epoxy is scraped off and then a final cleaning is done using acetone.
That completes the fitting of one of the half planks. Attaching the other half plank entails the same steps with a few slight differences. The scarf will now be on the bottom of the plank instead of the top like the previous plank and two inches must also be added to the plank for the scarf. Each full plank takes about six hours to complete. (6 hours x 12 planks = 72 hours of planking).
Row, row, row your boat...life is but a dream.
Labels:
bevels,
bulkheads,
epoxy,
fairing the curve,
gains,
lap joints,
planking,
scarf,
stringers,
transom
Wednesday, July 29, 2009
Scarf Joints
When Tom finishes, there will be twelve planks on this boat, or in actuality, 24 half planks. The planking material isn't long enough to span the entire length of the boat so two half planks are joined somewhere near the middle of the boat. The joint that connects the two planks is called a scarf. Scarfing is the process of beveling each plank so they can be overlapped and epoxied without creating any additional thickness to the plank. Tom uses an 8:1 scarf on these planks. This means that for every one increment of plank thickness, the bevel will be eight increments wide. For this boat, the planking stock is about 1/4" thick so the bevel needs to be 2" wide. The bevel will start at the full thickness of the plank and will end at the end of the plank in a feather edge. One plank will be beveled on its topside and the other on its bottom and when the bevels are slid together, they will equal the thickness of the plank. The 8:1 scarf provides a large surface area for gluing and makes for a very strong joint. Once the epoxy has cured, the scarf joint will be stronger than the rest of the plank. Aside from aesthetics and strength, another benefit of this type of joint is that it allows the plank to continue its fair curve and not develop a flat spot that other joint types, such as a butt joint, would.
Row, row, row your boat...life is but a dream.
Wednesday, July 15, 2009
Let the Planking Begin!
The planking is a little slow-going at first. After laying the two bottom most planks (called garboards), two strips were attached to them near the transom. Due to the near vertical angle of the garboards at the transom, the strips are needed to give the next planks a good landing to be attached to. The three foot strips of mahogany have a rolling bevel that tapers down until the strip is feathered into the planking.
Gains are also cut into the top edge of each plank. Gains are a three quarter inch wide by 16 inch long area that tapers evenly from the top ply to the bottom ply over that 16 inch section of the plank. Gains are what allow the adjacent planks to fit flush against each other at the stem (bow) thus eliminating the "lap" in this area. This flush area results in a finer, quieter entry into oncoming chop and is also very pleasing to the eye.
Row, row, row your boat...life is but a dream.
Labels:
gains,
garboards,
planking,
rolling bevel
Thursday, July 9, 2009
Don't Spare the Clamps!
Seven mahogany strips were cut to form the outer stem lamination. The strips are 3/16” thick which stack up to a little over 1 ¼” in total thickness. The 2 ¾” wide strips bent nicely over the inner stem. A plane will be used to clean the epoxy ‘squeeze out’ from the sides of the lamination. We will remove the outer stem and then reinstall it after the planking is done.
Row, row, row your boat...life is but a dream.
Monday, June 29, 2009
Taking Shape
After the building jig was assembled, the legs were adjusted to make the entire assembly level. A support piece for the stem was added and then the station locations were measured and laid out on the jig. The temporary frames and bulkheads were then attached to the jig at their appropriate stations. The transom was attached to a temporary frame with the bottom edge cut at a 25 degree angle giving the transom its needed rake.
After making sure the forward bulkhead was plumb, the stem was attached to it. One of the temporary frames has additional supports added to make it rigid. The keel is attached to the rigid frame and also to the other frames, bulk heads, stem, and transom therefore making the entire assembly rigid. After planing the proper angle on the transom and making some minor adjustments, the keel was screwed and epoxied to the stem, bulk heads, and transom. A quarter knee was added where the transom and keel meet for additional strength. The keel was removed just before being permanently attached to have the edges routered and all surfaces sanded.
The sheer clamps (in-whales) were attached next. Compound angles were cut at the stem along with cut outs in the transom. Next came the stringers which also have compound angles at the stem and cut outs in the bulk heads and transom. The top two stringers on each side were steamed in order for them to accept the twist that is needed to mate them to the stem and the transom. A hand saw, coping saw, and chisels were used to cut the openings in the bulk heads and transom. The stringers and sheer clamps were all removed after the initial fitting to be sanded before being permanently attached. The stringers all extend slightly past the stem so they can be planed to the exact angle needed to match the stem bevel. Much time was spent making sure all of the stringers have fair curves which will be reflected in the planking.
Next up:
- Outer stem will be laminated using the stem as a form.
- Keel, bulkheads, and transom will be beveled.
- Outer skin of the transom will be attached.
Row, row, row your boat...life is but a dream.
Labels:
building jig,
bulkheads,
in-whales,
keel,
planking,
quarter knee,
sheer clamps,
station locations,
stem,
stringers,
temporary frame,
transom
Saturday, June 6, 2009
The Gunwhales, the Keel, and the Stringers
Tom ripped the wood for the gunwhales, the keel, and the stringers.
Row, row, row your boat...life is but a dream.
The Transom
Tom finished the transom. You see it here, leaning against the building jig that the frames will go on.
Row, row, row your boat...life is but a dream.
Thursday, May 28, 2009
Beveling the Stem
Tom beveled the stem and it turned out beautifully. It has been marked with stringer, sheer clamp, and station locations. This is a substantial piece of mahogany and it will add so much in terms of strength and beauty to the boat.
Row, row, row your boat...life is but a dream.
Tuesday, May 26, 2009
The Bulkhead Frames and the Transom
The router's flush cut bit does a fine job of trimming the okoume to match the frame.
You can never have enough clamps!
The Oukoume came in from Edensaw Lumber so Tom was able to attach it to the bulkhead frames and trim it to size on the router. Then, using African mahogany, he started building the transom using lap joints. Next, the transom will be shaped and completed.
Row, row, row your boat...life is but a dream.
Wednesday, May 20, 2009
The Frames
The frames are the forms that the boat will be built around. They support the stringers which are longitudinal strips of wood that the planks will be attached to. Tom completed the temporary frames and will complete the bulkhead frames when the plywood comes in on Tuesday.
Row, row, row your boat...life is but a dream.
Monday, May 18, 2009
Continuing with the Stem

Tom completed the routering and then laid out the bevel lines on the stem. It's very important when building the stem to make certain that the rolling bevel meets up exactly with each individual plank. The next step in the process is doing the actual bevel.
Row, row, row your boat...life is but a dream.
Friday, May 15, 2009
Building the Stem
The stem is made up of six 3/4" pieces of Phillipine mahogany. There are three lower stem pieces and three upper stem pieces. Tom started work on it by first laying out the six pieces using the template and then rough cutting them on the bandsaw. The upper and lower pieces were then epoxied together making three pieces. The template was then attached to the center piece and used to trim the stem on the router to shape. The three pieces were then epoxied together. Next, the center piece will be used as the template by the router to trim the outer pieces to match.
Row, row, row your boat...life is but a dream.
Wednesday, May 13, 2009
Tuesday, May 12, 2009
The Wood
Okoume plywood, often called mahogany plywood, is an African hardwood. It is light brown in color, sometimes lustrous, with variable interlocked grain. Okoume panels exhibit high strength to weight ratios, ideal for boat building. Face veneers are 2.3 mm thick, A/B grade, and rotary cut. Cores and crossbands are solid jointed and panel glued with waterproof/boil proof glue. Marine grade okoume meets or exceeds British Standard 1088. Okoume panels are extensively used by race class boat builders, rowing shell builders, and in various applications where its light weight, high tensile strength, good bonding properties and ease of finishing are of value. On this Penobscot, we'll do the hull planking, bulkheads, and transom in okoume.
All of the interior wood will be either Phillipine or African mahogany. The Phillipine mahogany is a beautiful honey brown when finished and will match the okoume planking nicely. It will be used as structural lumber to build the hull, the longitudinal stringers, the stem, the bulkheads, and the keel.
African mahogany is a deep, rich, burgundy-brown which will compliment the more subtle interior tones and be a stunning contrast to the white exterior. It will be used for the seats, gunwales, breast hook, and quarter knees.
The deadwood will be of white oak which is an excellent boat building wood. It is very tough and takes fastenings well. Due to its closed cell structure, which inhibits the intrusion of water, it is ideal for the one piece of wood on the boat that will remain submerged during normal use.
The combination of okoume, Phillipine mahogany, and African mahogany on this scale will be beautiful.
Our local lumber supplier quoted a four week delivery time for the okoume, so we contacted a well known boat lumber supplier in the Northwest--Edensaw Lumber in Port Townsend, Washington (www.edensaw.com). They did have some on hand and it should arrive within three to four days. In the meantime, we purchased the mahogany and the white oak as well as some pine for the frames and the building jig from High Desert Hardwood in Eagle, Idaho.
Row, row, row your boat...life is but a dream.
Labels:
African mahogany,
Edensaw Lumber,
High Desert Hardwood,
okoume,
Phillipine mahogany,
white oak,
wooden boat
Friday, May 8, 2009
Studying the Plans
We received the plans from Arch Davis Design and they look good--very complete and professional. They included full size mylar templates for the frames and spreaders which should save us considerable time. Before ever heading into the shop, Tom will spend many hours studying these plans because the more prep time he puts in, the less time he will have to spend redoing anything.
Row, row, row your boat...life is but a dream.
Thursday, May 7, 2009
A Little History

"The origins of the Whitehall boat are misty at best. W.P. Stephens, the noted small-craft historian, thought the type originated at Whitehall Street in New York City in the 1820s. Other reports say the boat originated in Whitehall, England. Wherever it originated, by the time the clipper ships reached prominence, the Whitehall boat was frequently mentioned in literature describing waterfront activities. It continued as a dominant feature of waterfront commerce until the small, inexpensive gasoline engine emerged in the early 20th century. In the late 19th century, in Boston, Capt. Charlton Smith counted 75 working Whitehalls at "The Hub"" and another 19 in the "Cow Pen." During the same period, Tom Crowley, a San Francisco Whitehall boatman, reported 80 to 100 working Whitehalls in San Francisco.
The Whitehall boat performed the function of a water taxi. It ferried captains, businessmen, newspaper reporters, government functionaries, and assorted waterfront characters to and from ships arriving at the major harbors of the United States. Ed McCarthy, who was a San Francisco Whitehall boatman at the end of the Whitehall period, claimed: "When word came in from the lookouts that a ship was on the way in, the boatmen would all pile into their boats and race out to her. In each boat would usually be a chronometer man, a butcher, a grocer, a ship stores man. The first boatload would get all of her business while she was in port.
The working Whitehall boats were generally 17 to 20 feet in length, 4 feet 6 to 8 inches in beam, about 20 inches deep, and weighed over 250 pounds. The type spread rapidly and is best known in relation to New York, Boston, and later San Francisco, although it was used extensively in most harbors. In time, the Whitehall became the dominant influence on the design and construction of small yacht tenders and rowing boats through most of the 19th and early 20th centuries."
Row, row, row your boat...life is but a dream.
Wednesday, May 6, 2009
Choosing the Plans
After researching many different options, one plan in particular stood out to Tom, Sawtooth’s builder. The Penobscot 14 designed by Arch Davis (www.by-the-sea.com/archdavisdesign) seemed to meet all of the customer’s criteria, which among other things, was a traditional New England style rowing boat of lapstrake construction.
This boat is reminiscent of the working wherries and Whitehall boats that were extensively employed by New England fishermen and harbor runners beginning in the 1800’s. The glued (epoxy) plywood lapstrake construction method preserves the relationship between form and function. The boat will be as pretty as ever, but lighter, totally watertight, and easier to maintain than a traditionally constructed boat.
Tom spoke with the designer by phone and found him to be very amicable. Arch patiently answered all of his questions and assured Tom that the boat rows beautifully and can easily handle three passengers. The dimensions are:
Length 14’ 0”
Beam: 4’ 6 ½”
Weight: 155 – 175 pounds
John, our customer, liked the boat and gave us the go ahead.
Row, row, row your boat...life is but a dream.
Labels:
Arch Davis,
lapstrake,
Penobscot,
row boat,
Sawtooth Boat Works,
wooden boat
Subscribe to:
Posts (Atom)